Software and Firmware Setup
This guide will show you how to upload the miniscope firmware to the DAQ system and install the DAQ software on a PC.
Uploading Firmware
The current firmware image, 'msDAQ_Firmware_MT9V032.img', can be found in the root directory of the Miniscope DAQ Firmware Github Repository.
The USB Host Control on the DAQ PCB requires firmware to run. The firmware is written and compiled using the Cypress EZ-USB FX3 SDK. This SDK also comes with Cypress Control Center which can be used to upload the firmware image to the RAM of the USB Host Controller or, more likely, to the EEPROM on the DAQ PCB.
To program the DAQ PCB with firmware:
- Makes sure all SMD and through-hole components have been properly soldered to the PCB.
- Set the PCB on a non-conducting surface or in its 3D printed housing.
- Plug the 8pin DIP EEPROM (Part Number: ) into the EEPROM socket near the reset button on the DAQ PCB.
- Set the switches (SW1, SW2, and SW3) to the configuration shown below.
- Set the jumpers (K1, K2, and K3) to one of the two configuration shown below. If the EEPROM has not been programmed previously then either configuration will work.
- Connect a USB3.0 cable between the DAQ PCB and computer being careful not to apply too much force or torque on the USB connector. Make sure to use a short (under 3ft to 5ft) USB3.0 cable.
- Make sure the bottom 2 LEDs turn on.
- If this is the first time a DAQ PCB has been connected to your computer make sure the drivers install successfully (this should happen automatically).
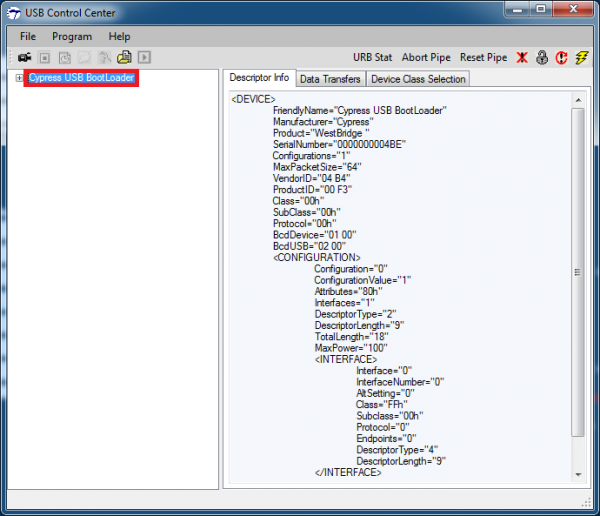
- Run the Cypress Control Center (which is included in the Cypress EZ-USB FX3 SDK). You should see the following:
- Make sure 'Cypress USB Boot Loader' shows up in the left column. This is your unprogrammed DAQ PCB.
- If 'Cypress USB Boot Loarder' does not show up you will need to follow the steps below to install the driver manually:
- Go to Device Manager and select the unidentified device (should show up as 'Westbridge')
- Click 'Update Driver'
- Click 'Browse my computer for driver software'
- Locate the the driver\bin folder in your Cypress EZ-USB installation directory likely located here: C:\Program Files (x86)\Cypress\EZ-USB FX3 SDK\1.3\driver\bin
- The driver should now be installed correctly and the device should show up in Cypress Control Center
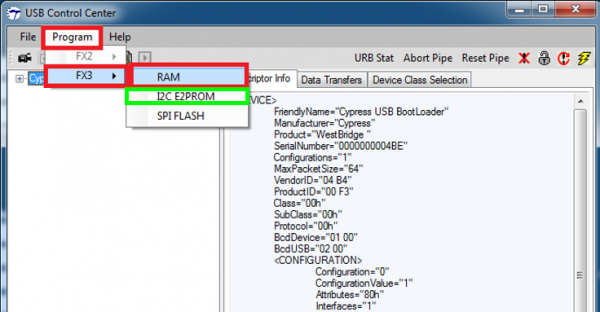
- Select Program then FX3 then I2C EEPROM. Selecting RAM will allow you to flash the firmware directly into the ram of the USB Host Controll but will be lose if the board is powered down or reset.
- A file browser will open up. Locate the firmware image, 'msDAQ_Firmware.img'.
- If programming the EEPROM allow around 30 seconds for programming to complete. A message at the bottom of the program should say that the firmware has been programmed successfully.
- Power cycle or reset the DAQ PCB. If the K1, K2, and K3 jumpers are configured to Boot from EEPROM then the DAQ PCB should show up in Windows Device Manager under 'Imaging devices' as 'MINISCOPE'.
- If only programming the RAM do not power cycle or reset the PCB. The DAQ PCB should immediately show up as 'MINISCOPE' in Windows Device Manager.
- You should now be all set. With the EEPROM programmed and the jumpers set to Boot from USB, everytime the DAQ PCB is plugged in it should enumerate as 'MINISCOPE'.
Installing DAQ Software
The current DAQ software executable can be found in the 'Compiled DAQ Software' folder of the Miniscope DAQ Software Github Repository. To run the software, extract all files into the same folder and run MiniScopeControl.exe.
Testing Your Miniscopes
Once you have built and programmed your Miniscope system you will want to make sure everything is working as expected. The Initial Testing of Assembled Miniscopes page will walk you through the process of testing the optics of your new system.


