Difference between revisions of "OvalDrive36 and OvalDrive18-ES"
| Line 16: | Line 16: | ||
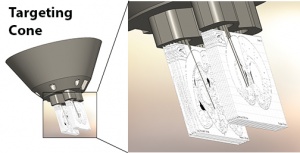
= TASK 1: DESIGN AND PRINT THE TARGETING CONE = | = TASK 1: DESIGN AND PRINT THE TARGETING CONE = | ||
| + | |||
| + | [[File:targeting_cone.JPG|thumb|300px]] | ||
1) Download a SolidWorksTM targeting cone template file | 1) Download a SolidWorksTM targeting cone template file | ||
| Line 23: | Line 25: | ||
3) Fabricate the targeting cone on a 3D printer | 3) Fabricate the targeting cone on a 3D printer | ||
| − | + | ||
<br clear=all> | <br clear=all> | ||
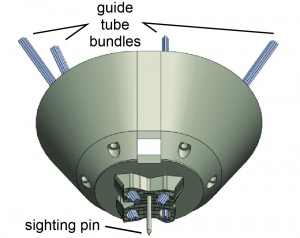
= TASK 2: BUILD AND INSTALL THE GUIDE TUBE BUNDLES = | = TASK 2: BUILD AND INSTALL THE GUIDE TUBE BUNDLES = | ||
| + | |||
| + | [[File:bundles_installed.JPG|thumb|300px]] | ||
1) Cut and store the guide tubes | 1) Cut and store the guide tubes | ||
| Line 41: | Line 45: | ||
6) Check alignment of the guide tubes | 6) Check alignment of the guide tubes | ||
| − | + | ||
<br clear=all> | <br clear=all> | ||
= TASK 3: PRINT AND PREPARE THE DRIVE CORE = | = TASK 3: PRINT AND PREPARE THE DRIVE CORE = | ||
| + | |||
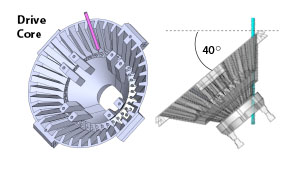
| + | [[File:drivecore.JPG|thumb|300px]]. | ||
1) Download a SolidWorksTM drive core file | 1) Download a SolidWorksTM drive core file | ||
| Line 55: | Line 61: | ||
4) Prepare the Drive Core | 4) Prepare the Drive Core | ||
| − | + | ||
<br clear=all> | <br clear=all> | ||
| Line 70: | Line 76: | ||
= TASK 5: BUILD AND INSTALL PROBE SHUTTLES = | = TASK 5: BUILD AND INSTALL PROBE SHUTTLES = | ||
| + | |||
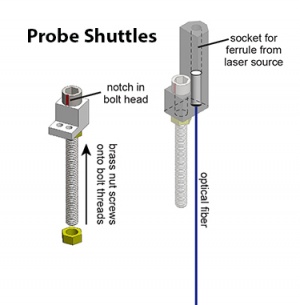
| + | [[File:shuttles.JPG|thumb|300px]] | ||
1) Download a SolidWorksTM shuttle brick loaf file | 1) Download a SolidWorksTM shuttle brick loaf file | ||
| Line 84: | Line 92: | ||
* Ground and reference wires | * Ground and reference wires | ||
| − | + | ||
<br clear=all> | <br clear=all> | ||
= TASK 6: SURGICALLY IMPLANT THE DRIVE = | = TASK 6: SURGICALLY IMPLANT THE DRIVE = | ||
Revision as of 13:11, 31 October 2018
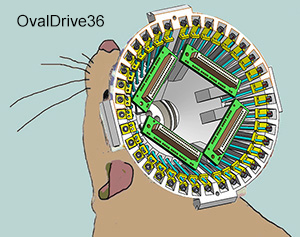
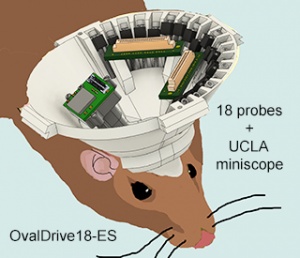
OvalDrive36 is a chronically implantable microdrive for rat neurophysiology experiments. Up to 36 individually movable probes (including single-unit recording electrodes, cyclic voltammetry probes, optical fibers, or fluid injection cannulae) can be targeted at multiple sites throughout the entire extent of the rat brain. With the Ovaldrive18-ES configuration, up to 18 individually moveable probes can be implanted alongside the UCLA miniscope for simultaneous electrophysiological recording and calcium imaging. A shuttle-in-groove design assures micrometer stability of probe tips over days or weeks during long-term recording experiments. OvalDrive36 is well suited for experiments employing convergent methods of electrophysiology, optogenetics, fast-scan cyclic voltammetry, and intracranial infusions of drugs or viral vectors.
- NEW!!!!! OvalDrive18-ES holds 18 driveable probes + UCLA miniscope
- for information about obtaining drives and parts contact blairlab@gmail.com with subject heading 'OvalDrive36' or 'OvalDrive18-ES'
- developed at UCLA by Hugh (Tad) Blair, Rose M. DeGuzman, Andrew Howe, & Garrett Blair
Contents
[hide]TASK 1: DESIGN AND PRINT THE TARGETING CONE
1) Download a SolidWorksTM targeting cone template file
2) Design your targeting cone using SolidWorksTM
3) Fabricate the targeting cone on a 3D printer
TASK 2: BUILD AND INSTALL THE GUIDE TUBE BUNDLES
1) Cut and store the guide tubes
2) Cut and store the bundle collars
3) Assemble the guide tube bundles
4) Construct the sighting pin
5) Install the guide tube bundles
6) Check alignment of the guide tubes
TASK 3: PRINT AND PREPARE THE DRIVE CORE
.1) Download a SolidWorksTM drive core file
2) Fabricate the drive core on a 3D printer
3) Cut and store the guide tube sleeves
4) Prepare the Drive Core
TASK 4: MATE THE TARGETING CONE TO THE DRIVE CORE
1) Map each guide tube to a shuttle bay
2) Thread guide tubes into probe collars
3) Bolt the targeting cone to the drive core
3) Break off excess guide tube lengths
TASK 5: BUILD AND INSTALL PROBE SHUTTLES
1) Download a SolidWorksTM shuttle brick loaf file 2) Cut bricks from the loaf 3) OvalDrive36 can hold up to 36 individually moveable probe shuttles of the different types. If your drive uses more than one type of probe, then you should construct and install them in the following order:
- Carbon fiber shuttle (for cyclic voltammetry)
- Fluid cannula shuttle (for intracranial infusions)
- Optical fiber shuttle (for optogenetic stimulation)
- Electrode shuttle (for field potential or single unit recording)
- Ground and reference wires
