Difference between revisions of "Fabrication and Assembly Guide"
(→Assembling MINIscope housing) |
(→Building cables) |
||
| Line 31: | Line 31: | ||
== Building cables == | == Building cables == | ||
| + | More assembly information can be found [[File:CableAssembly|here]]. | ||
== Assembling electronics == | == Assembling electronics == | ||
Revision as of 12:46, 9 June 2015
This page will walk you through the steps of building your own MINIscope system.
Contents
[hide]Ordering custom parts
The filter set, MINIscope body, and Printed Circuit Boards (PCBs) need to be custom made. Below you will find all the information you will need to order these parts.
Filter set
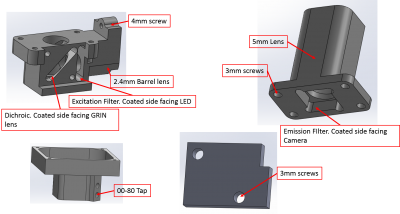
The MINIScope needs one excitation filter , one emission filter, and one 45 degree dichroic mirror. The filers must be cut to 4mm x 4mm and the dichroic must be cut to 4.8mm x 4mm. Filter and dichroic substrates should not exceed 1.1mm thick. Chroma provides affordable filter sets and quick custom cutting services but filter sets from any supplier should work as long as they meet our dimensional requirements.
MINIscope housing
All the MINIscope housing parts can be machined out of Delrin. We suggest using ProtoLabs' "first cut" service for machining. The 3D cad files for all parts can be found here.
Printed circuit boards
Ordering standard parts
Screws, magnets, and wires can all be ordered through McMaster-Carr.
Electronic components can be ordered though Digikey.
Optical lenses can be ordered through Edmund Optics.
Grin lenses can be ordered through Grintech.
Please refer to the part list for part numbers and suppliers.
Assembling MINIscope housing
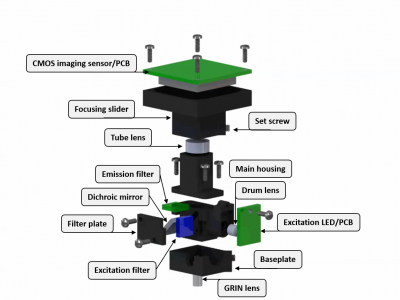
Assembly of the miniscope body and optics should follow the diagram below. No super glue should be used due to out-gassing. The drum lens and achromatic tube lens can be press fit with or without the use of optical glue. The screws are self tapping so no pre-tapping is needed. When placing the screws, attention should be paid to not over tightening, causing the threads in the plastic to be stripped.
Building cables
More assembly information can be found here.
Assembling electronics
The CMOS imaging sensor PCB and LED excitation PCB can be soldered and assembled in your lab or you can send the PCB and electronics out to an assembly house (we suggest using Sierra Circuits). Electronics part lists can be found here.
The DAQ PCB should be sent out for assembly due to the complexity of some of its parts. The Bill of Materials (BOM) can be found here.
Flashing DAQ firmware
Firmware must be uploaded into the EEPROMS of the DAQ hardware. You can either request a preprogrammed EEPROMS from us (which just plugs into the DAQ hardware) or you can flash the firmware yourself. In order to do it yourself you will need the Cypress Control Center which can be found here.
Setting jumpers for writing to EEPROM
Writing image to EEPROM
There image (DAQ_Firmware.img) can be found here.

