Difference between revisions of "Miniscope Gripper"
(→Description) |
(→Description) |
||
| (2 intermediate revisions by the same user not shown) | |||
| Line 4: | Line 4: | ||
Use the "Miniscope gripper - High resolution printing.stl" file if you have access to a high resolution printer (e.g., SLA printing). Use a m3 screw to clamp the miniscope. Take an aluminium rod (~6mm in diameter) and tap thread onto the rod. This can be screwed on top of the gripper and can be used to attach the gripper to the stereotaxic arm. | Use the "Miniscope gripper - High resolution printing.stl" file if you have access to a high resolution printer (e.g., SLA printing). Use a m3 screw to clamp the miniscope. Take an aluminium rod (~6mm in diameter) and tap thread onto the rod. This can be screwed on top of the gripper and can be used to attach the gripper to the stereotaxic arm. | ||
| − | Use the "Miniscope gripper - Low resolution printing.stl" file if you have a low resolution printer (e.g., Ultimaker). Tap m3 thread into the side hole of the gripper. Use a m3 screw to hold the miniscope. Tap m5 thread into the top of the gripper. Take an aluminium rod (~6mm in diameter) and tap thread onto the rod. This can be screwed on top of the gripper and can be used to attach the gripper to the stereotaxic arm. | + | Use the "Miniscope gripper - Low resolution printing.stl" file if you have a low resolution printer (e.g., Ultimaker). Tap m3 thread into the side hole of the gripper (use an 2.65mm drill). Use a m3 screw to hold the miniscope. Tap m5 thread into the top of the gripper (use a 4.5mm drill). Take an aluminium rod (~6mm in diameter) and tap thread onto the rod. This can be screwed on top of the gripper and can be used to attach the gripper to the stereotaxic arm. |
| − | [[File: | + | [[File:GripperExample.png|center|600px]] |
== Downloads == | == Downloads == | ||
Latest revision as of 09:20, 29 January 2018
Description
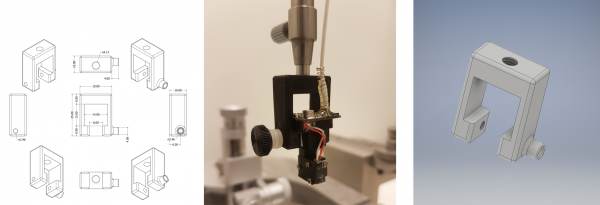
Together with Ralph Hamelink (NIN), we have developed a Miniscope gripper that can be 3D printed with low and high resolution printers. The gripper allows to hold the Miniscope during baseplating. This is especially convenient when imaging deep brain regions, thereby having a GRIN relay lens implanted. The gripper has been tested successfully during multiple baseplate surgeries.
Use the "Miniscope gripper - High resolution printing.stl" file if you have access to a high resolution printer (e.g., SLA printing). Use a m3 screw to clamp the miniscope. Take an aluminium rod (~6mm in diameter) and tap thread onto the rod. This can be screwed on top of the gripper and can be used to attach the gripper to the stereotaxic arm.
Use the "Miniscope gripper - Low resolution printing.stl" file if you have a low resolution printer (e.g., Ultimaker). Tap m3 thread into the side hole of the gripper (use an 2.65mm drill). Use a m3 screw to hold the miniscope. Tap m5 thread into the top of the gripper (use a 4.5mm drill). Take an aluminium rod (~6mm in diameter) and tap thread onto the rod. This can be screwed on top of the gripper and can be used to attach the gripper to the stereotaxic arm.
Downloads
Download the .stl files and 3D drawings here.
